November 18, 2013

Crafty Science + Games

On the last day of our week we have been being crafty in science, playing oceanography games and doing our nature notebooks. This first game was invented by Ellen McHenry the author of Professor Pigs Magic Math which we did when the boys were about 6 years old. I am a big fan of Ellen's Inventive games and crafts. You will see more from her in just a minute. Best thing is she is offering all of them for FREE!

Bites and Pieces is played very much like concentration, but instead of matching just to cars you are trying to find the info card plus the head, middle and tail of the shark. The boys learned many shark names and ways that God has made sharks unique one to another.


 Max putting his first shark together.

 Zak putting his first shark together.

TJ putting his first shark together.


Sting Ray hand puppets also invented by Ellen McHenry. We used some old food covering material and it worked beautifully and cost us nothing! Zak added some cool spots to his sting ray and it was so cool how he accidentally lined up the pattern to take advantage of the fake wood flooring pattern on the material. 


 Max is taking the pattern onto the fabric.

Now to cut it out.

Using a hot glue gun we put the pieces together and added some tin foil eyes. 

All three different, but all well done!

3D Ocean Bingo sorting animals of the ocean by Zones.


Her clam diagram is brillant!


And I am so impressed with this pop-up-barnacle page.

Check out what is inside the barnacle...

We have also been adding some more animals to our ocean board.


 And doing some nature notebook entries


Zak drew this clever little drawing of our dog, Diamond.

Thanks for dropping by!
 I hope you enjoyed our pictures. :)

Painting 101 Continued

 This week we are wrapping up our painting skills lessons from I Can Do All Things art curriculum which we began last year. I say painting skills because in this art lesson being creative was not our objective. The objectives were to learn the skills of painting such as mixing paints, wielding a brush, mixing colors, and  planning what to paint first then second etc. I think this is an important first step to being able to create. They are a few of the foundations that one must master so that when the artist has a worthy idea it can be expressed as the artist wishes.


Each time we sat down to paint inevitably Zak would ask, "How do you make Green?" after three or four lessons it changed to "How do you make brown?" Now he can make any kind of green or brown that he wants. 


Learning to wield a brush os not easy, it is different than the markers the boys are used to in that it is flexible and must be eloped with paint often. The boys became better at not scrubbing the brush, when loading it and when painting. They also learned how to move the brush to stay inside the lines. Some better and more patient than others but all in all they all improved in this. They also learned how to use the brush from the tip and how to move it t make different kinds of strokes.


They were always given red, blue, yellow, white and black to begin the paintings form there, they mixed what they needed.


They learned how to mix secondary colors and see how they relate to each other. 


They learned how to use tiny bits of blue added to white to make a sky blue but not too blue.


Because we are painting a drawing already drawn for us the student can focus on the painting not the drawing part of making a picture beautiful. Each lesson picture once painted looks great so the student can feel good about his or her efforts.


The prescribed drawings were often looked at by the boys and they would exclaim, "I could never paint that!" but by breaking it down and learning maybe a new skill or two they were bale to do it. Thus the title of the curriculum is true, the body learned they CAN do ALL things.


During the lesson above with the clown the boys realized that planning what things to paint first or second or third would help them paint the picture better. So on this lesson we talked through why the eyes, eye brows, lips and all the details came out messy, and they learned that they must paint from the background to the foreground so the paint can overlap and leave clean lines.


More challenges with shadows and how to make a darker green to illustrate that.


Some lessons just did not turn out all that well. There is always next time.


More practice making colors with the parrot lessons and adding white to make the brighter.


Max did this painting and because he had learned how to plan what to paint first his flowers came out beautifully!


I had one rule that we always followed and that was that they were never allowed to use the paint straight from the tube, they must mix at least two colors together. 


I hope you enjoyed seeing their good work!

Thanks for stopping in.


November 5, 2013

Viking Lapbooks


Our viking lapbooks created by us!


Max is putting the front cover together on a lap book we designed ourselves using bits and pieces of other lap books and images we found online or from Cd's we purchased.


This cover is made by TJ. All the covers were made by cutting off the bottom portion of the front flaps to make the sail. The viking hull and oars we adapted from this make-it-yourself viking boat pattern. We printed it on card stock and glued down only the bottom and the side edges so that it remained sort of a shallow pocket for the viking men to sit inside. The shields came from the viking boat we made in passport to the Middle ages ship last week, and the viking sailor is a coloring page reduced to 40 percent when printed.


Max added the water below the boat on his lap book and TJ took his idea and made water on his as well. They each did the title a little differently.


Max's cover includes two cleverly hidden pockets to hide hidden treasure he says.


And Zak added three extra vikings to his ship and used the black and yellow colors to make it look more fierce.


Detail of Tj's Viking.


Zak's viking men and viking mask.


TJ is working on his map under the table. :)


What's on the inside of TJ's Lapbook? 
(the tan dragon that sort of hold the map down is also under the long house. The long house is glued down on top of the dragon portion underneath.)


The vikings are mostly known for their ship building, raiding and sailing so the map shows the travels of the vikings, and the larger flip book on the right describes all the things vikings were most know for. The smaller flip book details things the vikings were less know for. Thus if you lift the map you will see more of those things.


When the map is lifted up there are more items; the viking alphabet, two recipe cards for barley bread and beef stew, which slip down into the long house.


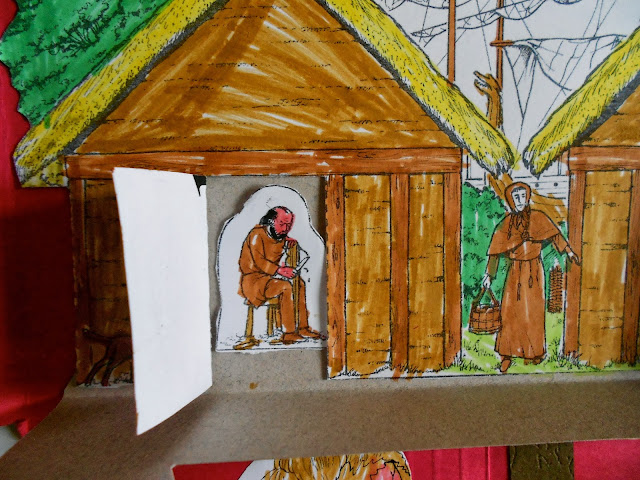
The long house doors open and inside are viking men and women doing every day things. 


Zak is working on his long house under the table too!


On the underside of the viking trading map is the term viking defined. and more info about who the vikings were.


We made viking masks and the boys pretended to 'go a viking'


This lap book was the culmination of our month long look at the vikings. Over the months time we have been reading many books and listening to a few audios and seeing some really great documentaries, they are as follows:


(very similar to Lief the Lucky but a more complex story)

Links to more Viking lap book ideas


Viking Voyages board game you remake yourself