October 29, 2011

I Can Do It!


Twice a week we have been following Barry Stebbings drawing lesson in I Can Do All Things. When we got to this lesson on drawing balloons and clowns Zak looked at the clown drawn in the book and said, "I could NEVER do that!' This comment made me smile because the title of our book is 'I Can Do All Things'. It is something every artist old and young needs to remember...I Can Do All Things! So, smiling, I had Zak read the title of our book and then he smiled too. He wasn't sure when we started the lesson he could draw a clown, but as we followed the steps outlines for us on the lesson page he ended up with a smashingly good clown. He was pleased.

Max's Clown
The lesson Zak learned in art class is a lesson for us all. Everyone faces situations in life that are beyond what we know we ourselves can do. Art or math or any other subject can bring us to our knees in tears with hopeless feelings of pending defeat. But one doesn't have to be defeated. There is always a way to begin and to see just what we are made of. In our school I encourage the boys to begin with one step towards the doomed thing and see if they then can concieve of step two and so on. Most often just getting started is the biggest hurdle to overcome.

For us with a new life in Christ we have a friend who is always with us working for us to do what we need to do that day or that lesson. Daily we remember his presence with us. It is cool when school work becomes a way to know Jesus more and learn how to talk with him. When they see what Jesus can do through them they will love him all the more.

Of the things that we hope to develope in our children through home education, having a  perfect record of no wrong doing isn't one of them. We know and teach them that failure leads to more understanding which leads to success. One things we do aim at is a can do spirit that will not be despaired with an hurdle in it's path, but seek ways to get over it. Giving our best effort shows us who we are and who we need to have with us for help. This self knowledge is good to learn. Every boy wants to know if he can do it. There are many great lessons in this challenge of the hurdle for little boys to learn; how to begin, how to break big tasks down into smaller tasks, how to ask for help, what questions to ask, or when to know we need a break before we go at it again. But perhaps one of the most beenfical things to discover is that we however we are made need Jesus.

I was intrigued by this article last week. It suggests a wonderful idea that success leads to more success. When I am setting up our schedule for any given school day, I always keep this in mind. I look for ways to challenge the boys and give them oppertunities to succeed. It really doesn't matter what area they succeed in for the one who succeeds in somethings will look for other things to succeed in. The feeling of succeeding is contagious. So I am on the look out for these sucesses because I know that one success snowballs into another.

T.J.'s Clown
and this book by Micheal Pearl about developing a can do spirit in your child.

October 27, 2011

A Blossom in The Desert: Reflections of Lilias Trotter

A friend of mine handed me a pile of books saying, "I think you might enjoy these." I thumbed through the covers and noticed the many rich illustrations and smiled. She knew me. The books were lovely and I am treasuring them. With a cup of herbal tea I curled myself up in my favorite reading spot, my papasan chair next to a window that looks out over my garden. I selected A Blossom in the Desert  first because it looked like an easy read and I was in want of something beautiful and inspiring. It was no easy read, each page is rich in beautiful illustrations from Lilia's journals entreating one to stay longer and look. Her scripted thoughts about God and her daily nature walk reflections are short but deliciously meaty. Thank you Anna, you may never know how this little book has inspired me.


Lilias Trotter was a daughter of a wealthy father who raised her with all the privileges of life in England at the turn of the 18th century. It was fun to learn she was emerging as an artist in England around the same time Charlotte Mason was emerging as an educator. It was also fun to learn Lilias studied art under John Ruskin whom Charlotte quoted so often in her writings. Lilias though very gifted as an artist turned down an opportunity to study full time under Ruskin and to be made known to the world, to follow God to the coast of North Africa where she spent the next 40 years of her life among the Muslim people of Algeria A Blossom in the Desert is a book devotional writings and drawings from her sketch book while she was in among the Algerians. She had the habit of rising early in the morning and spending and hour outside in nature reading her bible and learning she says from the words in the pages and the nature around her. Her simple faith and teachable spirit is refreshing and the drawings which accompany them inspiring. It suggested to me that nature journaling may be expanded to more than scientific study but also to the listening of the heart to God. Why not draw and listen, write and paint our communion with the everlasting God. Lilias's habits have inspired me to one of my own....nature study with God.


With her pocket sketch book and her keen eye she lived the credo Ruskin outlined for modern painters: " The greatest thing a human soul ever does in this world is to see something, and tell what it saw in a plain way. Hundreds of people can talk for one who can think, but thousands can think for one who can see." -Miriam Hoffman Author of A Blossom in the Desert.
Daisies Talking


 "The daisies ave been talking again-the girls brought in a clump the other day from their saturday afternoon hours in the country. Somewhere long ago I saw that the reason they spread out their leaves flat on the ground-so flat the scythe does not touch them-is because the flowers stretch out their little hands, as it were, to keep back the blades of grass that would shut out the sunlight. They speak so of the need of deliberately holding back everything that would crowd our souls and stifle the freedom of God's light and air." page 178

The Lord is my portion; therefore I will wait for Him.
Lamentations 3:24


Miriam Huffman the author of this devotional diary writes that she was not allowed to print the devotional books until there was a biography written of Lilias Trotter. So she took it upon herself to research and write the biography which is called Passion for the Impossible. Sounds like another good read.

October 24, 2011

I Got Some Egypt In My Pocket

The idea of a pocket is simply charming. You can make pockets in so many different ways, in so many sizes and with so many different materials. Then there is the fascinating thought of what to put into it, and what to take out of it. I love pockets!

So, this year when I wasn't sure how to organize our study of Ancient Egypt and stumbled upon Evan Moor History pockets, I was intrigued. The pocket idea sounded interesting. It had possibilities I had not thought about. To get an idea of what history pockets are I purchase the history pocket for Egypt e-book by Evan Moor from Currclick and took a look. They showed how to make the pockets and provided activities and information to put into the pockets. I liked the way the activities resembled mini books and notebooking pages we had used before. Looking at their ideas made my mind began to see even more possibilities. So from their idea we have jumped into a fun and 'not sure how it will turn out' project that will take us the whole year to put together. But we are all tickled with the new creativity it spawns in us all.

The first problem I had to solve was, what to make the pockets out of. I wanted them to be durable and look somewhat like papyrus. I also wanted the materials to be inexpensive because we plan to do nine pockets during the year. Times that by three, nine for each boy and you end up making 27 pockets. Rice paper can get a bit spending working at that quantity. Then I remembered a post Jimmie wrote last year about Sprite's sixth grade lapbook of Egypt. She had used a large brown mail envelope. That was it! So I went to work to design some pockets out of  brown mailers I had on hand here in my house.

The pocket idea from Cover to Cover.
The next problem to solve was how to make the pockets. The Ancient Egypt history pockets e-book I purchased had an idea which used one piece of construction paper, but I felt our pockets needed to be a bit larger. So I went to my shelf and pulled down a book called Cover to Cover. It is all about how to make  handmade books. In this book I found a wonderful pattern and directions for the pockets. The best thing was that I only had to throw away one 1 inch strip of my mailer and was able to use all the rest of it. I love that! The tutorial for making the pockets can be found here.

The Book idea from Cover to Cover.
Well now, looking at Cover to Cover wet my appetite for more creativity. In the pages of ideas for making books I found a style of handmade book that would lend itself easily to binding up our pockets once they were all complete. This method allows for the book to be as thick or as thin as we want. The cover can be hand crafted by the boys and then the pockets can be stitched together as if they were each a signature (a signature is a grouping pages). The cover once created can be stitched on at that time as well.

The boys were particularly interested in this stitched book idea because they are learning to hand sew on felt this year. It is a skill they chose to learn so I have been helping them with simple sewing projects. To think of sewing up a book captured their imagination and gave then a goal they wanted to work for. I may end up doing most of the sewing but it will be good for them to see how it is done.

Our idea for making the cover is simple. I have some Egyptian origami paper that the boys can hodgepodge onto a thick piece of cardboard. It will most likely be the thick cardboard from the back of our drawing paper pads. The boys will create a title to paste over that and we will see what happens then.

So our plan is to continue making pockets out of mailers, filling them with oversized mini books, maps, pictures, and other things we make or do as we learn more about Ancient Egypt.  Our first pocket, Introduction to Ancient Egypt,  is complete. We are currently working on The Kings and Queens of Egypt pocket.

Fronts of the pockets.
What's on the inside.
The items in this pocket that I added are:

'My Photos' photo album

One pocket down and eight more pockets to go!

Makin' Pockets

Pockets can be great fun for anyone, and they can be used for just about any subject you are teaching. We are using pockets for our study of Ancient Egypt but why not use them for science, or language arts... the sky is the  limit. In this tutorial I will show you how I made the pockets we are using for history. I am using durable, brown 10 x 15 inch mailers with an adhesive closure. You could use really nice hand made paper, or other materials you may have on hand. It is all the same. Here is how to begin...

You will need:

one 10 x 15 inch mailer
sissors
glue
a ruler


    First, at the opening edge, cut along the long side of the mailer.
    Then cut along the bottom of the mailer so when opened it will lay flat.
    Lay open the mailer that has now been cut and fold up the bottom edge  4 inches.
    Unfold the bottom fold you just made and peel off the adhesive paper so that flap can be stuck down. If the adhesive is lacking in strength add some glue and stick it down tight. This will make a nice edge on the pocket. (I wish both sides could have one)
    Fold in each of the sides 1 inch do not glue them down yet.
    
    Cut away the one inch portion of the side which is part of the pocket flap. This is your only waste. Cool hunh?
    Now glue the one inch sides down. and fold up the pocket and glue that down as well.
    You are done!
    The only thing left to do, is to decorate the cover.
    
    Come take a look at our first pocket for Ancient Egypt.

October 21, 2011

What Composition at This Age?

"Writing, of course, comes from reading, and nobody can write well who does not read much." says Charlotte Mason in School Education (page 233)
When I think about composition my mind goes to high school, and college where I wrote essays for tests and papers for term projects. But just when do you start learning about composition? Just what is composition? When do you begin to write? Is it when you compose your first essay? When you begin penmanship? Could it be simply when you first start retelling something you learned from a novel like Charlotte's web? Jack Beckman in his article in When Children Love to Learn says this:

"In a small class of second graders, the teacher is asking the students for 'composition' to be done on a portion read from Charlotte's Web. but here now....we see no pencils brought out, and where is the paper for writing? However, the students are eager to share their 'composition' with the teacher and each other, and so we must begin. Lovely words and sentences flow forth from the students. A sequence from beginning to middle to end emerges as the students compose for the teacher from what was read only once and to which they listened attentively. What we might believe to be written composition in fact turns out to be oral-a narration." -page 148

In a CM education composition begins at around age six (though it could be earlier, CM recommends waiting until six) when your child begins retelling what he absorbed by hearing a reading from a book. He is narrating. Prior to this he is made ready for narration by having many well written books read aloud to him. His knowledge of words, and phrases and ideas is being formed with the very first book. He is absorbing them as he has been absorbing all of the new ideas and things in his world thus far. He is an explorer hungry to know, and fully equipped with a fine mind to gather, and retain knowledge he needs for growth. As ideas spark light in his little mind and he excitedly tells you about it he is beginning compositions.


So composition is simply a progression begun by hearing words and phrases read to your student. Then your student will begin telling back what he has heard. By putting the ideas from the book, including the words and the phrases into his own words, or pictures or however he best retell and idea he is composing. This may go on for some years as the student's ability to read and to write become fluent. Once the students is comfortable wielding words with his pen, written compositions begin.

The powerful element in CM's method is that the student moves from knowledge of one rudiment to next in a smooth and natural progression with a full mind. First HEARING well written sentences full of ideas, Thus his mind is full of things to tell about. Second TELLING back in his own words the ideas that nourished his mind, thus gaining the power to posses the ideas and use them as he wants to. Lastly, WRITING his ideas down for others to share in. By following CM's flow the child is led gently into composition and he will be fluent to retell his thoughts and reactions to an idea both in words and in writing.

Though we think of composition as mainly having the end result of writing, I can imagine how enjoyable it would be to have a conversation with a person who is both well read and able to retell his thoughts about what he knows in a clear and interesting way. To learn of ideas and to compose our thoughts about them is part of life, not just in writing.

My boys are just on the cusp of this method. They are learning to do composition orally. As they are learning to pay attention to a reading at their level of understanding they are composing what will in days ahead be writing. It is so rewarding to watch this develop. I am thrilled when I hear them talking to each other in their play using vocabulary clearly from the books we are reading. Or when they challenge themselves to write a sentence and they use large words like 'represents' or technical terms like 'photosynthesis.'


My dad, 'Grandpa Al' reading to the boys on our last visit there.

How to begin? I try to read aloud to my boys for at least two hours each day. That doesn't ever happen in one stretch because my voice gives out. However, I have found that beginning the day with 1/2 of reading before lessons, and ending the day as they are going to bed with 1 hour of reading, plus what we read during our lessons covers the two hours nicely. When the boys play quietly in their rooms in the afternoon time, we sometimes add on more listening via audio books. Last year, we enjoyed the complete Beatrix Potter stories again and again. Thus their minds are filling each day with something new to think about.

This year is the first year where we are doing narration regularly in our lessons. We narrate mostly orally after a reading and sometimes via hands on projects, notebook pages and lapbook mini books. At this age I am only concerned about their retelling me their ideas. So the notebooking pages serve three purposes; for narration orally, and then handwriting practice and copywork as they copy the oral narration I wrote on the white board onto their paper or into their minibooks. I have noticed that drawing pictures for my children is easier than putting their thoughts into words. (is this a boy thing?) Though it has been said it is a form of narration, I am still aiming for the words and prodding them gently to use them. Pictures do speak a thousand words, I an artist, am well aware of this but the words are also useful tools in all of life and they can be a good friend in the years to come. So we aim to grab a hold of them and master them like we do the sticks and the rocks and the lovely dirt and mud outside.

October 18, 2011

Birdmen

Zak, T.J and Max in their bird masks.
Today we made bird masks. The masks were inspired by the birdman's song in Mozart's opera The Magic Flute. We have been listening to Classical Kids version of the opera and the boys fell in love with the birdman,Papageno. They wanted to learn his song and to go along with the song of course you must have a mask. An opera with out a mask is no opera at all.

T.J., Zak, Me, and Max
I even got in on the fun and made a mask for myself.

Max's Mask
We each picked out a different mask pattern. Max chose this pattern.

Zak chose this pattern.

T.J. used this pattern and I this one.

To Begin:
  1. Cut out the pattern.
  2. glue on feathers and sequins or beads.
  3. Let dry thoroughly.
  4. make a hole on each side and pass a ribbon through the hole. Tie a knot and then fasten to your head.
For a good turtorial on making a bird mask with paper check out this one.

October 17, 2011

Landing on Mercury

In the spirit of the Magic School bus we rode through the solar system this week and landed on Mercury. We left earth over a month ago after a brief introduction to what astronomy is and can be, and then took a long look at the sun. I know you are not supposed to do that. We used our special goggles designed for exploration of this sort and saved our precious eyes. This week and last week we were on Mercury.  It was very hot, and very cold and very dusty. Once we got home we put these pages together to remind us what we learned about the planet of contrasts.

Here is a look into T.J's astronomy notebook.
The page on the left contains pictures from our activities when we were learning about the sun. On the right is Mercury at night. Due to the lack of atmosphere this planet is a very cold -300 degree Celsius at night. And BTW night lasts here for roughly 59 days.
Another look into T.J.'s book.
This is mercury during the day. It is very very hot due to it's being the planet closest to the sun. The day here also lasts 59 days. The mini books for these two pages were from A Journey Through Learning lapbook package and Knowledge Box Central lapbook  package both geared for direct use with Exploring Creation with Astronomy by Fulbright.

To remember just where our trip led us, we drew mercury on our map.

To understand how mercury got so many craters and how they were formed we dropped different size rocks into a pan of flour. With the left over flour we did the following....


Using the flour from the crater activity we made salt dough. With a little black powder paint added we made replicas of the planet mercury.

Zak holding his mercury model.

And that is all for this week...next time Venus!

October 16, 2011

Glorified Map Drill

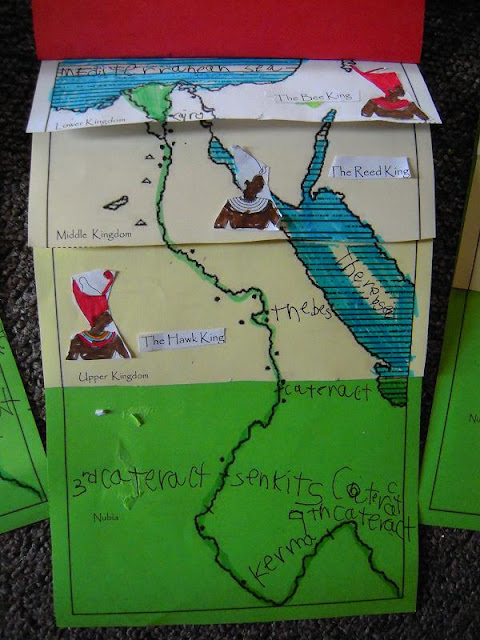
Last week we skipped doing map drill due to important interruptions. However that led us to something even better this week. In an attempt to save the map drill lesson I ended up incorporating it into a project we were doing with some info from our reading this week We are reading from The Pharaohs of Ancient Egypt. In the end we came up with a cool looking map flip book.


The info we needed to incorporate into some form of project was this:


• The three kingdoms of Ancient Egypt: upper, middle and lower Egypt. (we also included Nubia for fun)

• The names of the three kings: The hawk king, The reed, king and the bee king.

• The hats worn by the three different kings: The red hat for the lower kingdom, the white hat for the middle kingdom and the two hats in one for the upper which dominated and became the hat of the two lands.

• Lastly the items on our map from map drill. We got carried away and added all four cataracts, and the Mediterranean sea. We usually only add one item each week. But why not add more, it was fun!

I put together the flip book on my own ahead of time just to get my own mind around the lesson. But when I introduced the lesson I gave the boys only the info. We then discussed how we could somehow turn that info into a project. We discussed different things we could do to explain or show this information visually. The lesson flopped a bit because they were not as enthusiastic about the info from our book as I was, which made them less enthusiastic about doing a project with it. This often happens in life. Each person in reading a passage from any good book will get different things out of the passage depending on who they are, what they already know etc. So, even though they were not excited like I was by the info when we read it, I thought it was still a worth while endeavor to continue on with a project idea. By doing this they are getting a chance to see how it can be done and will most likely begin thinking of their own projects as we read along in our book of the pharaohs and I will be waiting in the wings, ready to see that project come to life. In the future I am hoping and praying to see their ideas, not mine made into projects. But for now I don't mind teaching them to dance by letting them stand upon my shoes. So we danced to my footsteps this time and it turned out quite nice. The bys did an great job, and learned more about the three kings, the lay of the land according to the kingdoms and what was really a new idea for them was that lower Egypt was at the top of our map. I hope in the future, to do a salt dough map of Egypt so they can see why the lower Egypt is really lower and upper Egypt is really upper due to the muntains in Nubia.

In the end after talking about the info and the project ideas, they liked my idea best. So we embarked on the adventure of making it.

• First we cut covers to match the maps. Then we decorated the cover with an old style map and the title.


  • Next we cut the bottoms off three of the four maps we had. One map was for lower Egypt, one for middle Egypt, one for upper Egypt and one for Nubia. This is the same map we use for our map drill so we already know it quite well. Each map was printed on a different color paper so it would be easy to see where one kingdom stopped and another began.
  • Next we stapled all the maps and the cover together so the map tiers would fall into the correct position.
  • Next we colored and cut out the three kings and placed them on the correct kingdom where they were known to have ruled.
  • and lastly we did our map drill and added features to the map(s) and colored it in.

    Max's map, Zak's map and T.J.'s map in that order.
      
This Kingdoms of Ancient Egypt map flip book can be downloaded here for free. Enjoy!

October 13, 2011

Focaccia Bread

For the last four months I have been eating away a gall stone. Well, not exactly eating it away but by changing my diet and supplementing a few choice herbs I should be gall stone free in about 1 year. So in a way I am eating it away. I can not eat any dairy products, or animal fat. I am not allowed eggs or other foods which are high in cholesterol. So that would include shrimp even though it does not really bother me with symptoms. I have trouble with blood sugar balance before the gall stone I already avoided processed sugar and stayed mainly with natural sugars like raw honey, date syrup, and agave nectar. So my diet has dwindled down to grains, fruits, vegetables, legumes, fish and some other sea foods, and that is about it. I can have coconut milk, coconut oil and olive too.

So with those ingredients I have been finding I have fewer choices sure, but the lack of choices pushes me to discover new foods and ways of cooking I have not yet tried. After all, the saying, "Necessity is the mother of invention" implies limitations and deprivation in one way or another. I happen to love invention so I am not suffering on this new adjustment but I am working a little harder to get myself fed while I continue to feed the men in my house all the yummy things I can not yet eat. One thing I dearly love and have missed is pizza. My mom taught me how to make pizza, gave me a great recipe for sauce and I love to make it myself at home...my men love it too. But if you were reading above you will already know cheese is off my list, and so are meats which are integral to a fantastic pizza. necessity...my longing for pizza drove me to discover how to make focaccia bread, writing about it today forced me to learn how to spell it. :)

I brought out my copy of Martha Stewarts Baking handbook and tried her recipe. It was fabulous. I am now NOT missing pizza for this focaccia bread with a few sautéed veggies on top had filled the niche. Here is how it is made in case you want to try it too.

You start with mixing the flour (about 7 cups) and the water (3 1/2 cups), and only 1 t of yeast. No salt yet. This little concoction will need to set in a warm place until it has tripled in size and it will become a bit sticky. It should look like this:


Once it has tripled and become sticky you add the 2T of salt. I know that sounds like a lot but it wasn't overpowering in the end result. If you use sea salt you can do your body a big favor too and get all the minerals and goodies the white salt has taken out of it. This mixing should take place in an upright mixer, but I don't have one so I simply worked on making more muscles in my arm and whipped it around with a sturdy wooden spoon until all the salt was well mixed in. It is quite wet at this point and you want to add more flour but resist the urge and just keep your hands floured as you gently work the dough pulling up first one third and then another third folding the thirds into the middle. Then return the dough to the bowl and let rise until doubled. after it has doubled do the folding one more time, let double again and then you can proceed.

While you are waiting on the dough to rise (one doubling usually takes 1 hour) you can sauté a few choice veggies to put on the top. I chose to sautéed a yellow onion, a small eggplant, 2 small tomatoes, and 7 cloves of garlic. Sauté the veggies you have sliced or diced in olive oil and salt them and season them. I added a pizza spice mix I buy at Winco. Cook the veggies until they are soft and slightly brown. Then set aside until the dough is done rising.


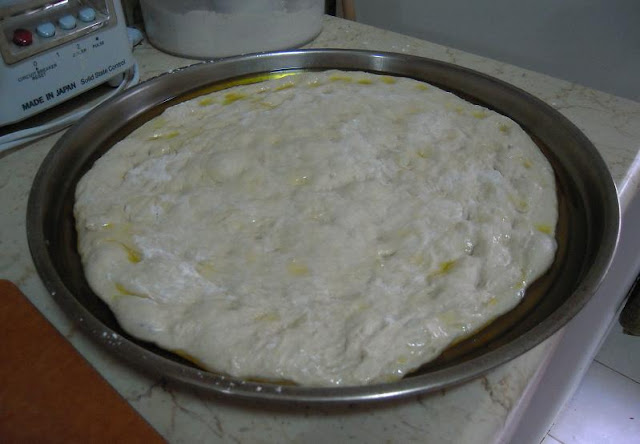
By this time the dough should be taking on a fun bubbly kind of light texture. Then in a baking sheet or pan with sides add 1/2 cup of olive oil. Place your dough into the pan and press it to the edges. The dough should be not sticky at this pint but it will feel soft and spongy. Once the dough is pressed tot he side it will look something like this:


Add the sautéed veggies to the top and another 1/4 of olive drizzled over the veggies. Sprinkle with sea salt and bake at 450 degrees for about 20 minutes to half and hour. Here is mine already for the oven.

The varity of focaccias that you can concot is endless just as it is with the pizza. Why not try a dried fruit focaccia with cinnamon and rapadura sugar on top. For the men in my house I am going to try to make a real pizza with the foccaia crust next time around. I am sorry I have no picture of the finished product it was eaten up so fast I never thought to take out my camera to get a good shot of it. Try it your self and see what a wonderful alternative it can be to the cheese and meat pizza.

October 12, 2011

Latin Can Be Artistic

Detail of T.J.'s Latin painting
We had allot of fun in our Latin lesson this week. Our vocabulary to master is father (pater), mother (mater), Sister (soror), and brother (frater). To begin the lesson I used these Montessori cards which I made at the beginning of the year. We did a few activities with them until I could see the boys were getting the vocabulary down. Then I pulled out some large drawing paper (11x17) and we drew and then painted a picture with those four elements in it....and allot more creativity too.

T.J.'s black and white sketch.
The first thing we did was to draw a pencil sketch of the father, mother, brother and sister and then put them into a setting. It was really cool to see these guys just fill up their paper with ideas. It was as if there wasn't room enough on this rather large space for them to get all the ideas out. They quickly drew the four required elements and then 'went to town' drawing houses, snakes, fish and stair cases etc. What a delight to see them drawing with such gusto.

Zak's black and white sketch
The spiral-like shapes on Zak's drawing are snakes. We had a snake adventure with some neighbor boys this week which I am assuming inspired the images of snakes in his and Max's pictures. The neighbor boys saw a tree snake going up a tree just outside of our house which is in the neighbor’s yard. They tried to shoot the snake out of the tree with a few shots from a gun which was loud enough to give all of us a good shock. Turns out the snake had bit a baby bird in a nest up in the tree and the neighbor boys had rescued the now half dead baby. It had a bite mark on it and some blood. The boys spent the afternoon hunting for the snake which got away in our yard, and my dh spent part of that time educating the boys on snake safety.

Max's black and white drawing.
After they did a pencil sketch they drew over the top of the pencil with black marker pens. Then we added some color with paint. We used water color and I think looking back I would not have them use the black marking pens since the black bled too much into the water colors and made the colors muddy. Lesson learned for next time.

T.J.'s finished painting.

Zak's finished painting

Max's finished painting.

October 6, 2011

I Want to Know


When I was in secondary school I have clear and vivid memories of the structure of school. I remember people I knew, classrooms I was in, lunches that were served, but I have few memories of what I knew. I have few memories of ideas that were being shared with me, and fewer memories of teachers who cared what I was thinking. When I went on to university to study art I remember making a conscious decision to sacrifice my grades so that I could have time to learn what I came to learn at the university, art. Art made me want to live, art gave me a center and a wonderful world of interesting ideas and skills I longed to possess. I was alive, focused, engaged, learning and feeling full. I went about my studies as a rabbit might follow her holes peering into each classroom absorbing the nutrients of knowledge as I was in need of it. For the first time I can recall, I was learning what I was hungry to know. I followed the bunny holes of my own interest not for the purpose of gaining a degree or preparing myself for a job (much to consternation of my folks) and I crammed four years of art study into eight fearing that I would one day I would have to work a real job and leave this precious time of learning aside.

Following university studies I took a real job with pay and benefits. After taking a job at HP for four years I married and found myself also with three darling boys and a new idea called home education tantalizing me into a future I never would have dreamt for myself had I been dreaming it alone. I was initially drawn to home education because of the desire to be with and know my boys. But, I have remained a home educator because I long to give my boys time to know things, to discover, and invent. I want them to have lessons which spur on love of ideas, knowledge and life. In this endeavor of home education I am also nourished by the ideas I am teaching and full of ideas which give my life meaning as well. It is a double edged sword this home education both filling the pipe and the bucket with wealth and purpose found in the ideas we learn about each day.

Recently I have been encouraged and inspired by Kim, Sara and Tracey via their blog Four & Twenty. I love how they encourage discovery and creative thinking as well as feeding their young scholars great literature written by great minds. Following is their description of an artful educator:

The Artful Educator

recognizes the extraordinary in each child

believes that children are capable of self-directed learning

adapts to the brilliance of the young mind

inspires the student toward purposeful action

presents authentic tasks

provides scope for meaningful exploration

emphasizes discovery

whets curiosity

offers depth rather than breadth

encourages personal responsibility in learning

…as a sailing instructor

“I'm not afraid of storms, for I'm learning how to sail my ship.”

-Louisa May Alcott


Charlotte Mason in her book Home Education Vol 6 page 300 discusses the need for scholars who are not mere cogs in a societal machine but people who have thoughtful ideas and are well read. Members of a community who are not driven by being useful to the community alone but by the creator who designed them and fashioned them for His purposes. The scholar who follows his bunny trails of ideas follows his heart and likely the one who made Him. Charlotte says:

“Now, here is a most mischievous fallacy (in education), an assertion that a child is to be brought up for the uses of society only and not for his own uses." HE Vol 6 page 302
She goes on to say that Children need time and good literature to feed their hungry minds food that will sustain them and cause them to grow mentally.

"If knowledge means so much to us, "What is knowledge?" the reader asks. We can give only a negative answer. Knowledge is not instruction, information, scholarship, a well-stored memory. It is passed, like the light of a torch, from mind to mind, and the flame can be kindled at original minds only. Thought, we know, breeds thought; it is as vital thought touches our minds that our ideas are vitalized, and out of our ideas comes our conduct of life. The case for reform hardly needs demonstration, but now we begin to see the way of reform. The direct and immediate impact of great minds upon his own mind is necessary to the education of a child. Most of us can get into touch with original minds chiefly through books" HE Vol 6 page 303 
So as I have been pondering this idea of knowledge and nourishment, and the need for time to digest it. I wondered how that practically could be reproduced in our little world of ideas and books here at our home. Perhaps we already have some things in place which feed the young scholar delveoping his mind and his purpose in life. But, perhaps there are corners in our education where old habits are starving the hungry. From Charlotte’s writings (HE Vol 6 page 300) and this PR article (The Open road) I found these points to ponder and reflect upon.

• Am I reading good literature to my young scholars giving them mental food and ideas from great minds to stimulate thinking in their own minds?

• Do I allow time for them to think, ponder, go deeper into a book or idea?

• Am I rushing them towards goals and achievements missing the meaning and wonder of the thought at hand?

• Do I allow them to live in the moment and to fill up their minds eye with all the interesting things they are discovering?

• Am I getting to the root of things, inspiring my young scholars to investigate and know more?

• Do I present education as a series of duties and assignments or as an adventure into unknown ideas ready to explore?

• Do I encourage questions?

• Am I modeling the beauty of each stage of life and each stage of learning?

• Do I revel in the present one showing them that another is coming that will be just as interesting as this one?

• Do I show my students the meanings behind everyday things? Habits we do and what they are for?

• Do I encourage imagination, insight and reflection?

• Does my young scholar know he is important just because he is?

• Can my young scholar think for himself with the knowledge I am giving him?

• Do my young scholar love to know new ideas?

• Are my young scholars full of ideas? Have they something always to think about?

• Do my young scholars read to know or read to achieve?

• Do my young scholars encounter ideas form great minds via book regularly?

• Do I love to learn, and to know for the pleasure of knowing?

• Am I pursuing my interests at home drawing them into them showing them the beauty or the pleasure of it?


I leave you with this final quote from CM:

“We launch children upon too arid and confined a life. Now personal delight, joy in living, is a chief object of education; Socrates conceived that knowledge is for pleasure, in the sense, not that knowledge is one source, but is the source of pleasure.” HE Vol 6 page 302