June 30, 2012

Uranus, Neptune, Pluto and making a cloud


Uranus and Neptune are also gas giants like Saturn and Jupiter. They are blue because of the methane gas in their atmospheres so we made our background paper color two shades of blue. One shade for Neptune the other for Uranus.


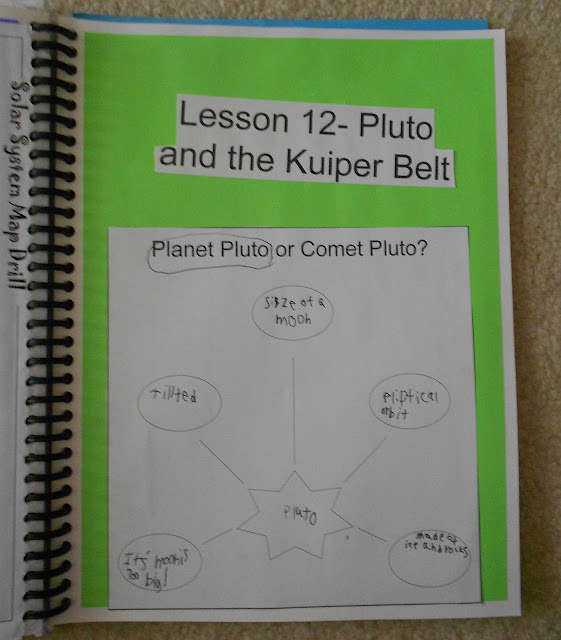
The next chapter and the last one for us this year is on Pluto and the Kuiper belt. We have been using Jennie Fulbright's text Exploring Creation through Astronomy.


There has been a big debate whether of not Pluto is a comet or a planet. Officially it is now a comet, but we looked at the evidence and I gave the boys a chance to vote for themselves...they voted that Pluto is a planet, I think it is a comet. What do you think?


How to make a cloud in a jar
  1. add warm/hot water to a jar.
  2. light a match and top it in.
  3. place a ziplock bag with ice in it over the opening of the jar and seal the opening closed.
  4. watch the cloud form.


This T.J's final map drill of the planets. Great job Guys!!

And that is all for our astronomy studies this year....we are already onto looking at birds and insects.


June 28, 2012

Seashore Diagram

After  long walk on the beach and bringing back several buckets full of treasure such as these I sat down with the boys and to them a bit about the strand line and the intertidal zone from our One Small Square: Seashore book. The strand line is the area on the beach where certain things are commonly found. For example, the crabs were almost always found at the strand line. The strand line is where the water comes up to the shore and leaves new things from the sea. You usually can find eel grass and other sea weeds there as well as kelp. It is easy to spot on any beach. After reading and looking at the beach itself to see just what the book meant, we made a cardboard diagram of it.

 This is Max's diagram of the tidal zones.

T.J.'s diagram

Zak's diagram.

How to make one:
  • First select a nice piece of cardboard for the diagram.
  • Next paint on the sea portion using up about 1/3 of the cardboard surface. This breaks the composition into thirds.
  • Let dry completely before going onto the next step.
  • Then paint some white glue onto the rest of the cardboard and sprinkle sand on it. Make sure the sand covers all of the surface. 
  • Let dry completely before going onto the next step.
  • The glue on articles from the beach from each of the tidal zones.
  • Label the tidal zones if you want to. 
Have a look at the process in our slide show below:


Overrun by Caterpillars


These are some of the caterpillars the boys found in the park the other day. They are literally all over the place. Since it was a drizzly day the caterpillars were climbing up the fences and on top of logs easy to find. In the span of say one half of and hour they had filled an empty one liter water bottle half full of them. They just about everywhere you could look. They were on the road trying to get across and getting smooshed. There were sooooo many of them it was impossible to count. They are in our yard, on the grass, on the road by the millions!!!


We also found some cocoons that day in the park. And as we were riding the ferry today, Zak notice one of the cars had cocoons embedded in the spokes of the hub caps. More than 10 in each wheel. How beautiful it will be when all of these caterpillars and cocoons become butterflies!


June 25, 2012

Green 'sickles

Now that warm weather is upon us we are delving into more cool sweet treats for afternoon snacks and after dinner desserts. These green 'sickles are so far our favorite indulgence. Though sweet and delicious they are also chalk full of nutrition as well. The green color comes from several large handfuls of kale, spinach and collard leaves.

I used this idea of a green smoothie recipe from Ali and Tom's website Nourishing Meals.com Really any smoothie you love will make great popsicles and give your kids a great nourishing snack during the hot summer months. Here's the recipe I used:

In a blender add the following:
1 honey crisp apple (I used a gala apple)
1 1/2 barlett pear
1/2 of a lemon only its juice
1/2 inch chunk of fresh ginger ginger. (leave the skin on but it is up to you)
1-3 T of maple syrup (I added this because when the smoothie freezes the flavors diminish some so adding a little natural sweetener can keep the sweet and it gives the pop a better consistency)
1 1/2 cups no sugar added apple juice ( you may not need this if you are using a vita mix...I used a ordinary blender)

Blend all of this until well incorporated and then add:
1 1/2-2 collard leaves (with or without the thick vein)
1 1/2 -2 Kale leaves
1 -1 1/2 fist fulls of spinach.

Add more no sugar added apple juice if needed and blend away. Once the mixture is well blended pour into a mold. Set in your freezer and later you will have a nice frozen treat.

Yummy!

June 23, 2012

Heiroglyphs

We have been having fun making our own heiroglyphic stamps using some old wooden playing blocks I picked up at a garage sale and some sticking back foam sheets. I introduced Hieroglyphs to the boys via the BBC documentary entitled Discoverying Egypt. Then we read through the book Heiroglyhs which comes with a handy dandy heiroglyph stencil which made our stamp making sucessful. If you have a minute take a look at our slide show of the project.


These are the tools we used to make our stamps.


Thanks for dropping by.

June 17, 2012

Every Day Life In Ancient Egypt Pocket

Our unit on every day life in Ancient Egypt though short was a lot of fun. I read aloud from:
Boy of the Pyramids, and Our Little Egyptian Cousin while they colored the following every day images and wrote about some of the everday events on the handwriting papers.


The every day things make a nice colorful pocket.
For this unit I ordered Ellen McHenry's Mapping the World with Art curriculum instead of doing a map drill. The map drawing curriculum includes maps for the whole globe and done in such a simple straight forward way the boys used only a pencil and eraser and a pen to make these  wonderful maps of egypt.

The boys also made these colorful costumes and dressed up as egyptians.

Max the greatest!

Zak and TJ the dancing egyptian boys.

June 11, 2012

Auguste Renoir and the New Notebook


This spring we have been taking a look at Auguste Renoir. The most famous painting he did was probably was the girl with the watering can, so I introduced this artist to the boys by having them do an art project with that painting. We did this fun technique with a Cezanne painting and it worked out so well I thought we would try it again with Renoir's Girl With the Watering Can.

Then we read a fun picture book entitled, The Girl With the Watering Can. We played several games of concentration with Renoir montesorri cards, and read the Smart About Art book About Him. Then we hunted through the You-tube files and found this fun video of him in his later years painting with arthritis deformed hands.

I started something new with Renoir that I hope will continue with all the other artists we study. I created a notebook art gallery. The idea came from this post. I loved her idea of keeping an ongoing gallery of all of the paintings the boys were learning. One day (I hope) they will be able to flip through it and recite all of the paintings by name that they have learned and share with others these beautiful works of art they have collected. It should make an impressive collection over the years.
With this great idea to begin with, I only had to make a few adjustments and we had ourselves a notebook gallery! The first adjustment was to use the notebook instead of the photo album. I had three white notebooks already. The second adjustment was to use plastic storage sleeves instead of photo album pages. I found these sleeves designed for storing coupons. Then, In publisher, I placed the image of the painting on one side and added some blanks to fill in on the other side. Then I printed them out onto cardstock and the boys put them into the sleeves how they liked. If  you already have the montesorri cards, buying sleeves to fit them could be a great way to start your notebook art gallery without having to create anything or print them out again.

Then slowly, maybe three cards at a time we looked up the date it was painted and filled in the other info on the card.
We haven't designed a cover for this notebook yet but as more artists are added we will. The fun part about this notebook is that you can add or take away the pages you want. This notebook may become our impressionist art gallery. Why not have one for each art period?
What I loved about using the notebook over the photo album was that we can insert our biography pages. Prior to creating the notebook art gallery I had no where to put this page once we had completed it. Now we do. We have already studied many impressionst artists, so perhaps as a review next year we will create cards for all the artist we have learned about so far and make this book a real work of art itself.

Metamorphosis

To begin our investigations of insects this summer we read Children of the Summer about Jean Henri Fabre and are reading now Fabre's Book of Insects aaannnndddd we ordered these caterpillars from Home Science Tools. Inside the cup were five painted lady caterpillars and food for them to eat to grow up big and strong. We set them out of the sun for several days until they began to grow.

After about three days the caterpillars had tripled in size.

Then, they each made themselves a chrysalis.

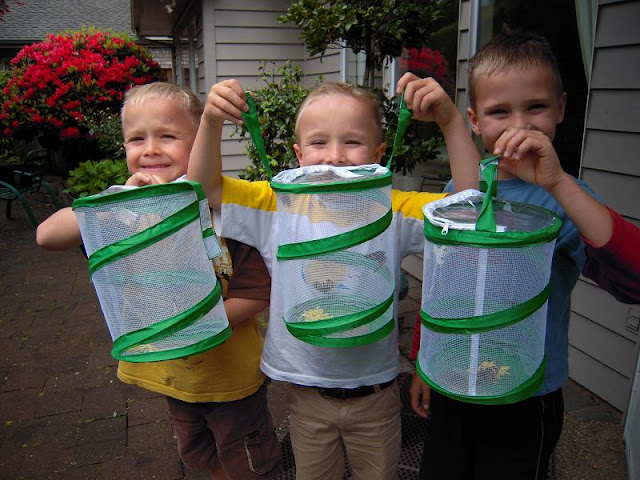
We placed a Chrysalis or two in each of our butterfly gardens and waited for them to emerge.

Once they emerged from their chrysalises we fed them for a few days with sugar water sprinkled on a flower at the bottom of the butterfly garden.

Then we let them go.